This month I am determined to post one recipe for each week. After I decided on this one, I thought how brilliant it would be to make this holiday month all about some of my absolute FAVORITE heroines growing up.
So…welcome to Tamora Piercemas! (Or: Piercemukkah, Pierzaa…I’m working on it.)
Anyway. At the beginning of The First Adventure, Alanna uses these tarts to threaten Coram into letting her continue on to the palace to become a lady knight. Well, not the actual tarts themselves. It turns out that Alanna and Thom actually stole these tarts from Cook, who threatened to tattle on them until they used their magic to make Cook See Things.
So one could say that if it weren’t for these tarts…Alanna wouldn’t have made it to the palace! Heh.
I’ve absolutely taken the picture with the wrong book, because I discovered I left The First Adventure at my parents’ house. Sigh.
The first thing I thought of when I decided to make these was: who even owns a tart pan? And also, who the heck wants to buy one to make tarts once a year? Rich people with a lot of pantry space, that’s who.
BUT! What’s something normal people own? Or at least would use more than once? Muffin tins! JUMBO MUFFIN TINS, to be more specific. (Although you could easily adapt this for a 12-muffiner, if you want.)
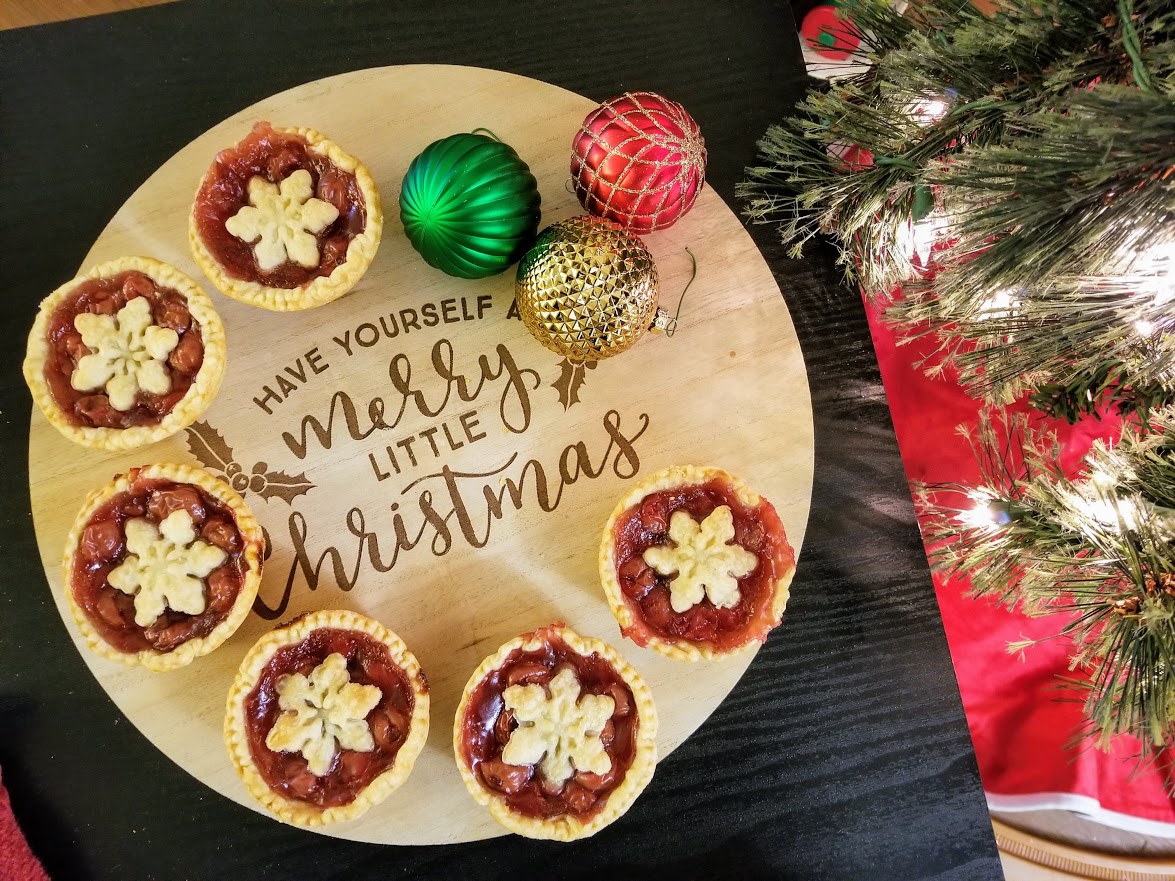
These mini cherry tarts are the exact right sweetness/tartness, with a little bite of lemon. I was particularly proud of my crusts, which made me feel like I was on The Great British Baking Show, with Paul using a knife to point at my non-soggy-bottom and saying “thats puhhh-fectly baked.” Why, yes, Paul! It is perfect!!
These would be super adorable for a potluck (if you double) or just for a family dessert. Everyone can have their own personal wee pie.
Cook’s Cherry Tarts
Makes 6 mini tarts
Ingredients
Pastry for Single-Crust Pie
These proportions are from an ancient Better Homes and Gardens cookbook. Feel free to use your own favorite recipe for single-crust pie!
- 1 1/4 cups flour
- 1/4 tsp salt
- 1/3 cup shortening
Filling
- 1 16-oz can pitted tart red cherries, water packed
- 1/2 cup sugar
- 2 tbs cornstarch
- 1/2 tbs butter
- 2 drops almond extract
- 1/8 tsp lemon zest (if you want the lemon to be really prominent, use 1/4 tsp)
Directions
Make the Filling
- Drain the cherries, reserving 1/2 cup of liquid.
- In a medium saucepan, whisk together 6tbs of the sugar, cornstarch, and reserved cherry liquid. Cook and stir over medium heat till thickened and bubbly; stir for a couple more minutes.
- Remove from heat and stir in the remaining 2 tbs sugar, butter, almond extract, and lemon zest. Stir in cherries and let the mixture cool while you make the pastry.
Make the Pastry
- Combine the flour and salt in a large mixing bowl.
- Cut in the shortening using a pastry cutter or two butter knives until (I’m sure you’ve heard it before) the shortening looks like little peas in flour.
- Add in cold water one tablespoon at a time until most of the flour is incorporated and form the dough into a ball. Don’t worry if it seems like there’s a lot left out-worry more about the consistency of your pastry. It should feel slightly tacky but should not pull away on your hands when you release it.
- Roll out your pastry to about 12×12 inches. Find a round cookie cutter or other round cuppish object around 4-5 inches in diameter (e.g. a margarita glass…heh). Lay it gently on the pastry and cut around it with a lattice cutter to get pretty edges. Alternatively, just use the cookie cutter/glass to punch out a plain circle.
- Try to squeeze out four circles of pastry from this first roll. Lay them aside on a plate or other surface in a dusting of flour.
- Roll out the pastry again and cut out two more circles as well as any design you’d like to put on top.
Assemble and Bake
- There is no need to spray your jumbo muffin pan.
- Lay a pastry circle gently over a jumbo muffin pocket (I think the word is cavity, but ew) and let it drop in on its own, helping it along a bit if it goes crooked. Press the pastry against the bottom and corners of the pocket so there aren’t any air bubbles. The pastry will cling slightly to the sides of the pocket and stretch a bit as you nudge it down, so that it reaches about 2/3 of the way up the pocket. Perfect!
- Repeat with the five other pastry circles.
- Give your filling a whisk. Pour 1/4 cup of filling into each of the prepared pastry crusts. Top with any design you’d like-or leave plain.
- Pop in the oven at 375 degrees for 30 minutes.
- Let the pastries cool in the pan for 15-20 minutes. Then pop them out with a spoon, using the spoon to lift the side slightly until you can grab it with your fingers.
- Cool on a rack for an hour, then chill in the fridge until you’re ready to eat!
